IFCRM | How to Run Reports
-
1How to Run Reports
GO HIGH LEVEL
Custom Reports Guide
How to Build, Schedule & Send Automated Reports
Version 1.0 | June 2026 | Provided by Immigration Finder
Platform Go High Level (GHL) Module Reporting > Custom Reports Applies To All staff who build, manage, or receive GHL reports Prepared By Immigration Finder OVERVIEW Custom Reports in Go High Level allow you to build tailored, branded performance reports and deliver them automatically to your inbox — or your clients' inboxes — on a set schedule. Instead of logging in to check dashboards manually, the data comes to you. This guide covers the full process: building a report from scratch, customizing it with widgets and branding, scheduling automated delivery, and managing reports over time.
NOTE
All GHL plans ($97, $297, and $497 sub-accounts) now have access to multiple dashboards and fully customizable reports.
1. BEFORE YOU START Requirement Details GHL Access Admin or reporting-level access required to create and schedule reports. Data in GHL Contacts, appointments, conversations, and ad integrations must be active. Recipient Emails Have email addresses of all report recipients ready. No GHL account needed. Company Logo Have your firm's logo file ready (PNG or JPG) for the cover page. Timezone Awareness Builder uses browser timezone. Emails use sub-account timezone. 2. HOW TO BUILD A CUSTOM REPORT — STEP BY STEP Phase A — Create and Name Your Report 1 Access Custom Reports
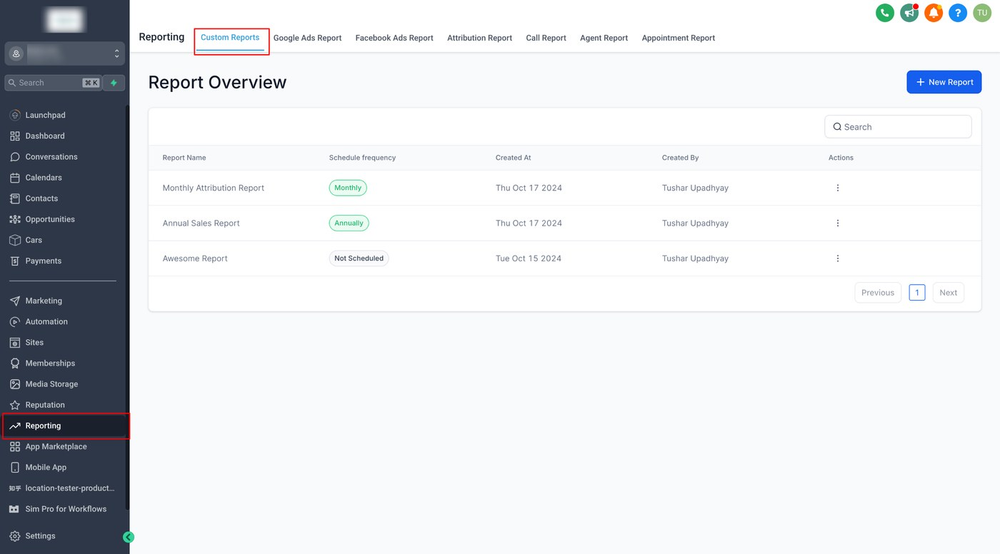
In the GHL left sidebar, click Reporting.
Select the Custom Reports tab at the top of the page.
The Report Overview screen shows all existing reports and their schedules.
Click + New Report (top right) to begin.
Figure 1 — Reporting > Custom Reports tab. Click + New Report to start.
2 Choose Your Starting Point
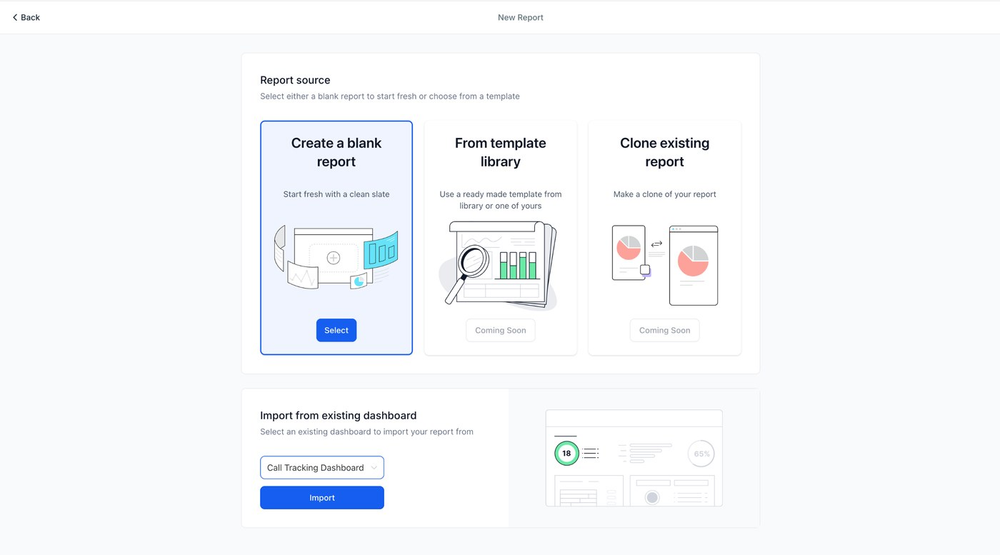
GHL presents three options on the Report Source screen:
Create a blank report — build from a clean slate.
From template library — use a pre-built layout (coming soon in some accounts).
Clone existing report — duplicate a report you already built.
Import from existing dashboard — select a dashboard and click Import to convert it instantly.
Select your preferred option and proceed.
Figure 2 — Report source screen. Choose Blank, Template, Clone, or Import from Dashboard.
3 Name Your Report and Manage Pages
Click the report name at the top center and type a clear, descriptive name.
Use names that identify the purpose: 'Weekly Lead Report' or 'Monthly Appointment Summary'.
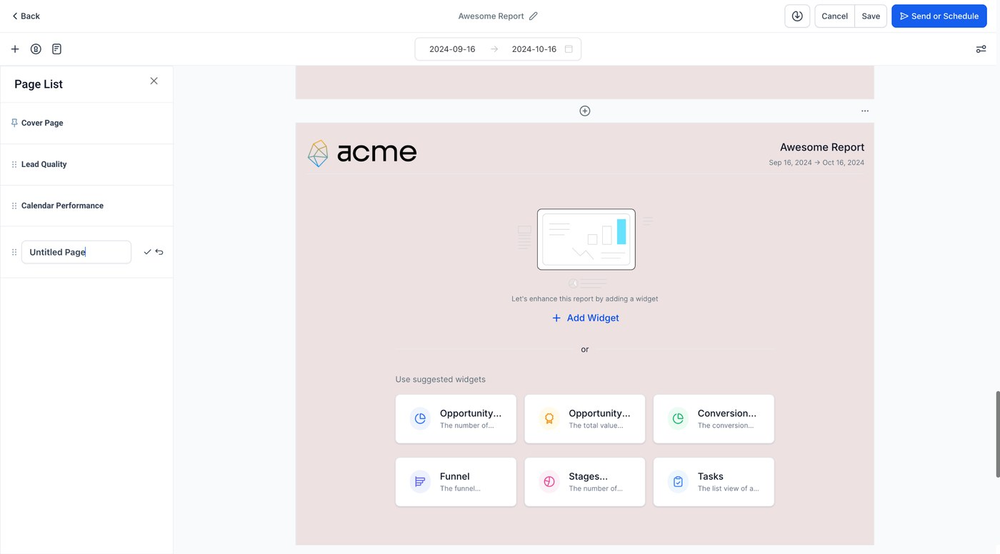
The Page List panel (left side) shows all pages: Cover Page and content pages.
To rename a page, double-click its name in the Page List.
To reorder pages, drag and drop them in the list.
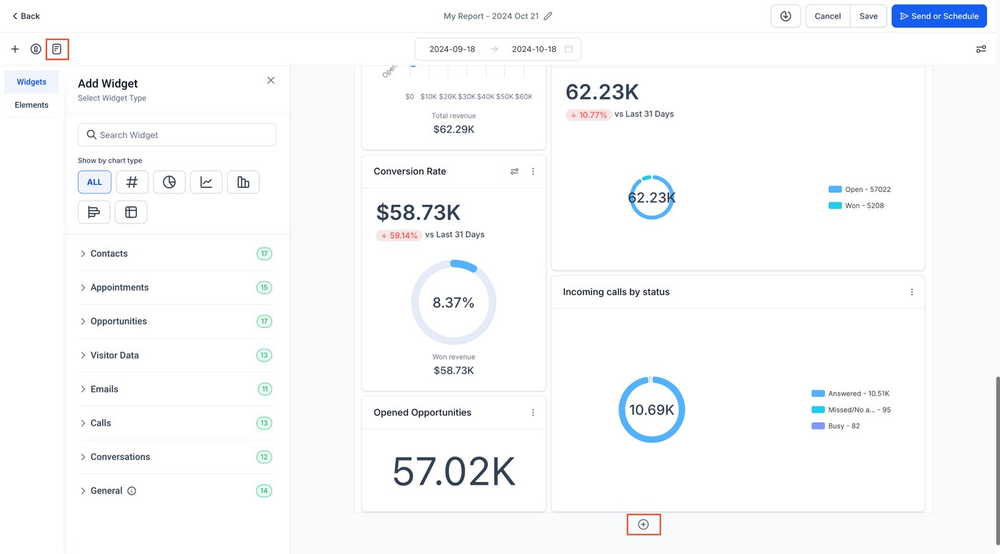
To add a new page, click the + icon at the top or bottom of any existing page.
Figure 3 — Report Builder with Page List open. Rename and reorder pages using drag and drop.
Phase B — Customize the Cover Page 4 Configure Page Properties
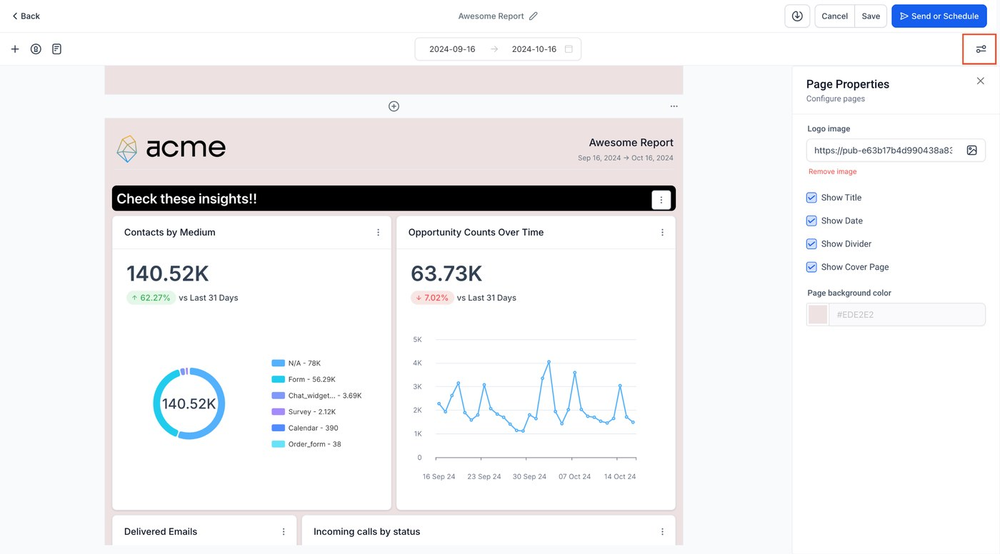
Click the settings icon (top right of the builder) to open the Page Properties panel.
Upload your firm's logo — paste the image URL or upload directly.
Toggle Show Title, Show Date, Show Divider, and Show Cover Page on or off.
Set the Page background color using the color picker or entering a hex code.
Figure 4 — Page Properties panel. Upload logo, toggle display options, and set background color.
Phase C — Add Widgets and Content 5 Add Widgets to Your Report
Click the page icon (top-left toolbar) to open the Add Widget panel.
Browse categories: Contacts (17), Appointments (15), Opportunities (17), Visitor Data (13), Emails (11), Calls (13), Conversations (12), General (14).
Filter by chart type using the icons at the top: counter, pie, line, bar, table, grid.
Search for a specific widget using the search bar.
Click any widget to add it to the current page. Drag to reposition.
Click on a placed widget to configure its data source and date range.
Figure 5 — Add Widget panel showing all widget categories. Search or filter by chart type.
6 Review Your Report Layout
As you add widgets, the canvas shows a live preview of the report.
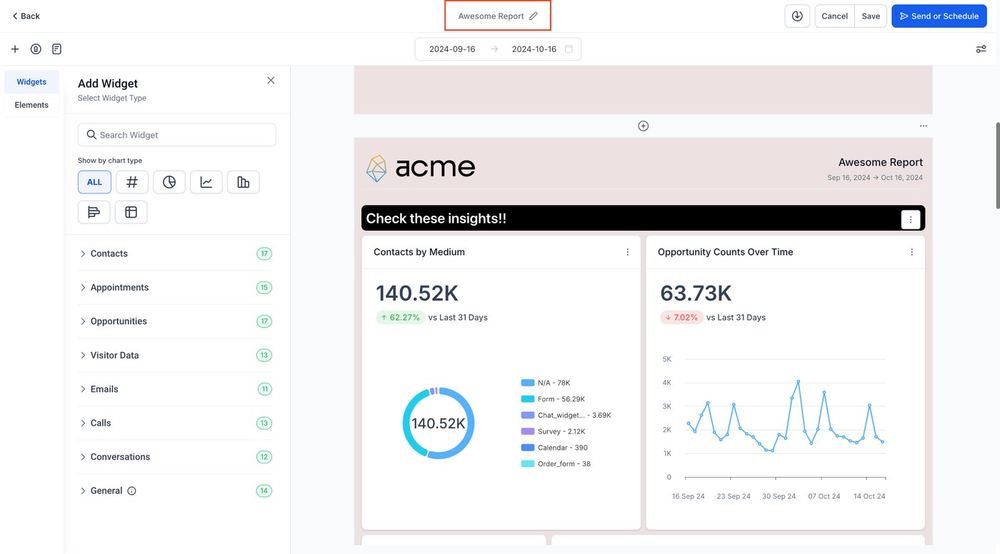
The report name is editable at the top center at any time (click the pencil icon).
Use the date range picker at the top to preview data for different periods.
Click Save at any time to save progress without scheduling.
Figure 6 — Report Builder canvas with widgets added. Edit the report name using the pencil icon.
3. HOW TO SCHEDULE AUTOMATED REPORT DELIVERY Scheduling is the most powerful feature of Custom Reports. Once configured, GHL automatically generates and emails the report to your recipients on a recurring basis — no manual action required.
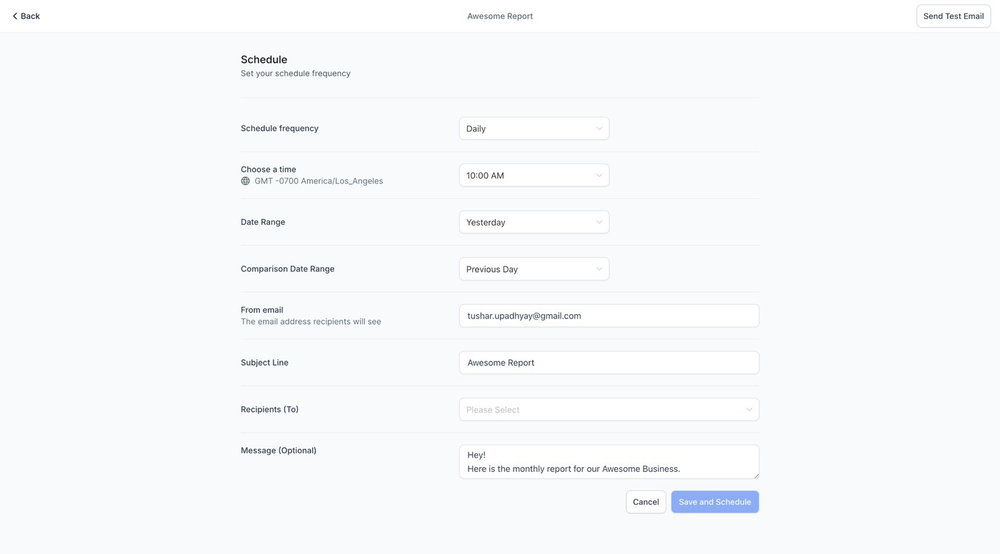
Phase D — Configure Schedule and Delivery 7 Open Schedule Settings and Configure Delivery
When your report layout is ready, click Save, then click Send or Schedule.
Schedule Frequency — Daily, Weekly, or Monthly.
Choose a Time — select the exact delivery time in your sub-account timezone.
Date Range — the data period (e.g., Yesterday, Last 7 Days, Last Month).
Comparison Date Range — optional trend comparison to a previous period.
From Email — the sender address recipients will see.
Subject Line — e.g., 'Your Weekly GHL Report — [Firm Name]'.
Recipients (To) — select recipients from your sub-account user list.
Message (Optional) — add a short message above the report in the email body.
Figure 7 — Schedule screen. Configure frequency, time, date range, sender, recipients, and message.
IMPORTANT
Report emails are snapshots — the email captures data at the exact moment it is generated. Changes made after sending do not affect previously sent emails.
Images and iframes display correctly in emailed reports but are NOT included in PDF exports.
8 Send a Test Email and Activate the Schedule
Click Send Test Email (top right of the Schedule screen) to preview the report in an inbox.
Enter your own email and review carefully — check widget data, layout, and date range.
Make any adjustments in the Report Builder before finalizing.
Once satisfied, click Save and Schedule to activate.
The report will now be sent automatically on your configured schedule.
TIP
Always send a test email before activating a schedule.
For weekly reports, Monday 8:00 AM is a recommended delivery time.
4. MANAGING YOUR REPORTS Task How to Do It Edit a report Go to Reporting > Custom Reports, click the report name, make changes, click Save. Change the schedule Open the report, click Send or Schedule, update settings, click Save and Schedule. Download as PDF Open the report and click the Download icon. Note: images excluded from PDF exports. Duplicate a report In the Report Overview list, click the three-dot menu and select Duplicate. Pause a scheduled report Open schedule settings, clear the schedule or set frequency to None. Delete a report In the Report Overview list, click the three-dot menu and select Delete. Cannot be undone. 5. TROUBLESHOOTING — COMMON ISSUES Problem Likely Cause Fix Widgets show no data Date range has no activity, or integration not connected Check widget date range. Confirm integrations active in Settings > Integrations. Report email not received Wrong email or email went to spam Verify recipient address. Ask recipient to check spam and whitelist sender. Data differs from builder Timezone mismatch between browser and sub-account Align timezones in Settings > Business Profile > Timezone. Images missing from PDF GHL limitation — images excluded from PDF exports Expected behavior. Images display correctly in emailed version. Cannot find a widget Required integration not connected Connect the integration first in Settings > Integrations, then retry. Schedule not sending Recipients field empty or schedule not saved correctly Re-open schedule, confirm recipient selected, click Save and Schedule again. 6. REPORT SETUP CHECKLIST BUILDING THE REPORT □ Navigated to Reporting > Custom Reports □ Clicked + New Report and selected starting method □ Report named clearly (firm name + reporting period) □ Cover page configured: logo, header, background color □ All relevant widgets added and configured □ Widget date ranges reviewed and set correctly □ Pages named and ordered logically SCHEDULING AND DELIVERY □ Clicked Save, then Send or Schedule □ Frequency set (Daily / Weekly / Monthly) □ Delivery time selected □ Date range configured □ Sender email customized □ Subject line written clearly □ All recipient email addresses entered and verified □ Test email sent and reviewed □ Clicked Save and Schedule to activate ONGOING MAINTENANCE □ Review report layout and data monthly □ Update recipient list when team members change □ Duplicate reports for new clients — do not rebuild from scratch □ Reconnect integrations if widgets stop showing data 7. GLOSSARY — KEY TERMS Term Definition Custom Report A configurable, schedulable report in GHL built with data widgets and delivered automatically by email. Widget A data visualization element (chart, counter, table) that displays a specific GHL metric inside a report. Report Builder The drag-and-drop interface in GHL for designing report layouts, adding widgets, and configuring pages. Cover Page The first page of a report, used for branding — logo, title, and report date range. Schedule The automated delivery configuration: frequency, time, date range, recipients, and email content. Snapshot Each emailed report captures data at the moment it is generated. Past emails are not updated when edited. Test Email A preview email sent to verify the report looks correct before activating the automated schedule. PDF Export A downloadable PDF version of the report. Images and iframes are excluded from PDF exports. Provided by Immigration Finder | GHL Custom Reports Guide v1.0 | June 2026 | Questions? Contact your Immigration Finder account manager.